RESOURCES
Scroll
Update Log/Older Notes:
1/11/2021: First update of 2022. Nothing much at all, just maintenance really. (But two resource Carrds nonetheless).
12/28/2021: Why don't you guys dabble with this?
12/27/2021: How to keep the font size from getting fucked up its ass when you use XP.css or 98.css in Carrd
12/27/2021: Boy oh boy. A couple new resource Carrds + that border code everyone's been asking for + updated about section + updated links + general maintenance + new shit site in my links, there's like fucking nothing on it and the design is basic as hell but IT IS WHAT IT IS!
12/16/2021: + Another new link code (this one is basic)
12/16/2021: + New link code (this one is not basic)
12/16/2021: Vertically scrolling marquee outside of embed in #marqueeoutside and new resource Carrd + bug fixes.
12/13/2021: Poopton of maintenance
12/13/2021: Redid text effect page so that every code is either on the section already or links to PB instead of W3schools.
12/13/2021: 2 new resource Carrds
12/10/2021: Resource Carrd
12/9/2021: 3 new resource Carrds, draggable windows Window and how to create the contents of the window outside of an embed, + updated #spin.
12/6/2021: Windows title bar and I have a new Carrd.
12/3/2021: Draggable elements
12/2/2021: Fixed marquee outside of embed code so that it doesn't cut off early and runs smoother.
12/2/2021: Shore Carrd tutorial and Nerdy Carrd template!
12/1/2021: Finally! Cloud borders here.
11/28/2021: New text thingy here, it's pretty cool, I also linked three new resource Carrds and there's a few new Carrds in my portfolio/I remade shore.crd.co.
11/17/2021: 2 new resource Carrds and fixed float on hover link
11/10/2021: How to style individual columns in Carrd.
11/5/2021: Added how to add sound effects to every element for pro plus AND for pro standard (without putting everything in an embed)
11/4/2021: Float on hover link
11/3/2021: Shaky hand tutorial, filter tutorial page (even though I still have to do a page for most of them), color change on hover code, new resource Carrd. Also added a few Carrds to my portfolio. OH! And I forgot to mention but I updated my about page yesterday or the day before. And maybe read the update in the other box here. I just wanted to say some stuff.
11/1/2021: Two new resource Carrds + this.
10/29/2021: YAAAY New filter here. It's awesome.
10/26/2021: I'm biting my nails as I type this-- What do you guys think of the blue background?
10/26/21: Maintenance, more resources in both the general links section and also the resource Carrd section.
10/23/21: A couple more resource Carrds.
10/23/21: Maintenance + font stuff.
10/22/21: Maintenance, nothing too special.
10/21/21: How to add loading animations without an embed.
10/20/21: Oh, and the wavy filter.
10/20/21: New resource Carrd and scratch text. I like it, hopefully you will too.
10/18/2021: New resource Carrds! I know it's not the most exciting update, but we're back after 5 days!
10/13/2021: How to add inline images outside of an embed. In the tutorials section in the outside of embed set. Or here.
10/8/2021: Fixes/maintenance.
10/8/2021: Maintenance + new background change code, doesn't look right here for some reason but whatever. Also I'm not marking new codes with a thing anymore. Also new inspo.
10/7/2021: Fixed bouncy letter code, now you can do it outside of an embed.
10/7/2021: Improved slide up menu code.
10/7/2021: Some basic loading animations so I can link to this Carrd whenever someone asks about it.
10/5/2021: Nothing much, just tips.
10/5/2021: A new kind of image slideshow where it flips and the image changes? IDK. Would look really good with sprites. Also I'm now marking new codes in the "codes" section with "NEW".
10/5/2021: Maintenance (fixed paper mask embed link).
10/4/2021: Nothing much, just a couple new resource Carrds. Because that's just what this Carrd was missing. LOLAPALOOZA.
10/4/2021: FIXED THE BLUR MENU CODES, NOW PIXELS WILL BE INLINE. I updated them all. FINALLY.
10/4/2021: Added a tutorial on image animations/blur menus without using an embed or any CSS.
10/1/2021: LOL, I added a blinking text thing I made on my own because I thought the other one needed to be in an embed. Well, there's two now. It's pure CSS, and the other one uses Java, if that makes a difference.
9/30/2021: Maintenance + added inspo in my portfolio.
9/30/2021: Addded a little automatic update thing on the homepage just in case I don't remember to update this every single time I add something.
9/30/2021: Link "hacks". 🤷♀️.
9/28/2021: Quarter-assed a new redesign. Hopefully things are more readable now? I'll work on more stuff later. + Also I added a link code.
9/26/2021: I half-assed a redesign. The site's still ugly but it is what it is. And it's barely done, too, so expect inconsistences.
9/26/2021: Marquee outside of an embed (in tutorials), horizontal scroll.
9/19/2021: FONTS!
9/19/2021: Added a link code/maintenance/about to add animations.
9/17/2021: Added some more resource Carrds.
9/15/2021: Shopped up Dinkle's Den a bit, more to come.
9/14/2021: Found & added the Tumblr wobble (the wobble effect when you're not logged into tumblr).
9/14/2021: Added disable left click/alert code, + two new tips.
9/13/2021: Redesign! Still looks shitty but I'll settle. Also some maintenance.
9/13/2021: Patched some stuff up + added wilardo.crd.co.
9/12/2021: Holy shit, I just added Dinkle's Den. Completely Dinkle. It looks shitty right now, but that's just because I needed to get it online and up and whatever... I'll make it look nice later.
9/12/2021: Added a Naked frame border, IB Talking Heads.
9/11/2021: Added a new link code + maintenance. Still working on some tutorials.
9/10/21: Did a shit-ton of maintenance and re-organized some things, updated the CRT code and just... sheet... A lot of stuff. No new codes but I've been working pretty hard on getting all these tutorials done so expect some of that.
9/9/21: The first part of the animations tutorials has been added-- An in depth set of tutorials on the transform properties. CHECK IT OUT!
9/9/21: Fixed the bouncing marquee-- Lots of bounce-related updates today ;D
9/9/21: Bouncy text code I've been playing with :)
9/9/21: Maintenance
9/9/21: Modified bouncy letters code added :)
9/9/21: Added more links to helpful sites, and started the animations page, but it might take a while for it to be put up because I have a lot to say on it.
9/9/21: Added double border with different colors/in-out
9/9/2021: Added tips..? IDK if they're good. Just some opinions.
9/8/2021: Added Arcjec.crd.co (CHECK IT OUT!)
9/7/2021: Another silly change on hover code.
9/4/2021: First update in a while, nothing special, just the custom highlight code everyone's been using.
8/29/2021: Paper mask code among general maintenance
8/27/2021: Bouncing marquee like in that shitty ecco2k carrd.
8/27/2021: Just added Nene's glorious menus I've been raving about...
8/26/2021: Just added ummm an animation code, more to come because I'm @keyframes happy right now.
8/25/2021: LOOOORD I just had to readd everything LMK if anything else is missing im crazay
8/24/2021: Added invisible scrollbar, added tutorial on how to change marquee speed,some other stuff.
8/24/2021: General maintenance. Sorry updates have been slow, I've been trying to come up with ideas, and school is just really kind of crazy... Hoping for more to come.
8/23/2021: A simple slide in code. Thoughts? I'm trying to come up with some new creative menus but I don't have so many ideas...
8/22/2021: Hey guys, another day off to a great start. Added a few border codes, a menu code, the image clicksplosion code, I have a lot of stuff I want to add today but I might not get to a lot since I'm kind of tired already.
8/21/2021: Gold frame code, rose frame code, these might be my last updates for the day since my parents are making me get off devices early.
8/21/2021: Vertical text, best for menus
8/21/2021: Just added black frame code. Many more border codes to come today, actually.
8/21/2021: Image cursor trail. Thanks so much everyone for 2k hits, it really means a lot, even if like a third of that is from me!
8/21/2021: Added the TV scan tutorial and reorganized a few things, added more resource Carrds, some other shit... More updates later today.
8/20/2021: Just added a tabs menu code, I think you'll all like it, it has some rules though, and is pretty JS heavy. LMK what you think!
8/20/2021: Neon Lights text (JS), W3Schools is back up! To prepare for another disaster like this, though, I'm in the progress of uploading everything to my pastebin.
8/19/2021: Just added five new codes, which are all in the same section, in hover codes, all under blur menus. I haven't seen them anywhere else, so I hope you guys like them!
8/19/2021: Just added all of my bookmarked resource Carrds & Tumblrs. I don't even use most of those resource Carrds.
8/19/2021: Pulsing text, AKA rainbow text (if you mess with it), pure HTML/CSS/can be used with element ID.
8/19/2021: Just added an improved rainbow text code, linked to Pastebin. It's JS, I'll add a pure HTMLCSS one later so that you can use element IDs.
8/18/2021: Pop container code. Three codes down for today, hopefully tomorrow can be more successful!
8/18/2021: Gradient border, pulsing border, about to add an edited version of pop off border that I perfected myself.
8/17/2021: LOL. I've been writing the date wrong all day.
8/17/2021: Custom selection, can't believe I didn't add this before.
8/17/2021: Just added the spin code. SORRY IF I SEND MESSAGES IN THE CBOX WEIRD, WHEN I TYPE ON MY PHONE IT GLITCHES
8/17/2021: Tv set code added. Doesn't look the best on this Carrd. Kind of tricky code. Today's been a busy day at school, so I'll dump a ton of codes when I get home. Sorry if I haven't been a ton of help today, I'm kind of scattered.
8/16/2021: Note: Alright guys, I'm logging off for the night. another very successful day tomorrow.
8/16/2021: JUST ADDED THE CURSOR TRAIL TOOLTIP CODE!!!! PLEASE CHECK IT OUT!!! IT'S THE BEST CODE YET!!!!
8/16/2021: Just added the enlargen on hover link. It's simple, but is one of my favorite codes right now. This might be my last update for the night.
8/16/2021: New code: Fading text. You know how it works.
8/16/2021: Just added the dropdown menu. I decided I'll play around with the curved text some more before I add it as a code, but if you want it, just ask.
8/16/2021: Fog mask has been added, I'm not too happy with it. I'll patch it up later. I got a 100 on my science quiz, by the way.
8/16/2021: Just added the fog border, information for it is like always in the code and on that page. LMK if you have any other q's.
8/16/2021: rainbow border, more to come
8/15/2021: About to log off for the night, just added a couple more codes. Tomorrow I'll add a ton more border codes and will will start working on the hover codes more.
8/15/2021: Lots of updates today. I've added codes and patched up some bugs but have mostly added tutorials. I've been adding a tutorial whenever someone on codes.crd.co asks a question I can answer with a tutorial on this Carrd.
Note: THE COUNT HITTER BROKE?????
8/15/2021: Just added a couple more tutorials and I'm going to fix the Kosugi Maru code.
8/15/2021: What I'm working on: Adding animation codes, adding link codes, and adding hover codes. Also a tutorial on the squiggly link.
8/15/2021: Back on that grind today. I'm adding new codes and patching some things up, as well as adding video tutorials.
8/14/2021: Hey, it's me again. I added fonts and more codes, and also some tutorials.
8/14/2021: Added many, many more things today and I'm currently still working on adding more. If a link doesn't work right now, it's just because I'm still working on that page.
8/13/2021: I just started working on this 8/13/2021. Expect updates every single day for the next week or so as get to starting this up. I'll be very active in the Cbox if you need any help.
Thoughts/Notes/What's to come:
1/11/2022: lmfao I bought judah.red.12/28/2021: I updated libertarian.crd.co with an about me section because I wanted to put pictures of myself on it.12/27/2021: Aw hell nah gifs.crd.co, I've been waiting for this moment my whole life12/27/2021: Yo. Happy holidays everybody. All I wanted for Christmas was a hot esoteric Jewish mommy dom girlfriend and I got that so I'm satisfied. My Instagram changed (HELLO @SUPERJAKE45 !) so that's something... Also important site update, like I said I'm going normalbro so updates are gonna be minimal over the break. I went to le Urban Outfitters today and got some mad t-shirts and I look boss as fuck in them so I've got that going for me. I should probably add more to the shore.crd.co tutorial since fucking everyone's been asking questions on it. Shoutout to that kinstagram couple Heaven and Jackson for using my shit since I remember being blow dafuck away by their Carrds when I started this stuff out (still super awesome looks). I got nothing else to say stream Die Lit it saved my life I love u Carti12/16/2021: DUDE IF YOU HAVEN'T SEEN THE JELLYMASK UPDATE YET YOU HAVE TO RIGHT NOW12/16/2021: T-minus 9 days till Christmas :)12/13/2021: Moving everything to Pastebin might not actually take as much time as I thought. But still.12/23/2021: I removed the font section, I'll make a new one later.12/13/2021: Okay, so W3 supposedly is supposed to cut all links to previously saved code when the new year comes. I really don't have the time to go through and add every single code to Pastebin. So maybe we'll get lucky and W3 won't shut the whole show down. But, and this is more likely, if they do, THEN I'll go fix all the codes. But until then. Fingers crossed. And on a personal note I'm going normalbro which means eventually stopping makings Carrds entirely. The truth is, normal dudes aren't really making these things. Normal dudes shouldn't understand half the stuff I read on you guys' Carrds. I went hiking yesterday and realized that I belong in the outdoors. If I would've spent the same amount of time working on my core that I have spent reading names in the Starborn typeface I'd have pretty much rock hard abs by now. But alas. Anyways, hope you guys are doing great! Smile more :)12/9/2021: I'm bored out my freaking gourd right now12/6/2021: What's up, guys?12/2/2021: God, updates two days in a row? Remember when I first started this Carrd and I was dumping shit here every single free second I had? I'd be aghast at my update schedule now.12/2/2021: Hey11/20/2021: I'm adding animated cloud borders but I'm having technical difficulties adding them to Carrd using element ID...11/28/2021: Hope anyone who celebrates had a fantastic Thanksgiving! I myself had a pretty good one.11/17/2021: Sorry for inactivity, I'm in lalaland11/10/2021: More stuff soon?11/5/2021: I want to add lots of stuff soon so here's some of what I'm going to add: 1. How to put borders around one column in a container, 2. How to change the background on click (best version), 3. This transparent textures thing someone on Instagram sent me, 4. Finish the filters tutorials. So look out for those!11/4/2021: I'm not sure what I'll add next, probably some codes and tutorial stuff.11/3/2021: I GOT IP BLOCKED IN THE CODES.CRD.CO CBOX. I THINK I MIGHT BE A CRIMINAL!!!! What did I even do, anyways? The world is crazy. If I ever get IP blocked on this Carrd's cbox that'd be hilarious. How are you guys? Good morning.11/1/2021: Good morning, guys. I've been thinking about shutting down the Carrd? Also what's the deal with the lack of messages in Cboxes lately -- it's not just this one. It's crazy. Like a total silence for 18 hours at a time. All the time. But annnnnyways. I'm not sure what to add 🤔10/29/2021: GOOOOOD MORNING, EVERYBODY! Still looking for some great things to add. And still as a WIP is that filter tutorial I discarded a while ago... Also can someone please say something in the Cbox, it's so lonely 😢10/26/2021: Yello! Updates have really tailed off since my vacation to the Dominican Republic. Hopefully I find/create some awesome new stuff but for now it's all just random. Hope you guys are having a great October!10/23/2021: IMPORTANT RESOURCE JU MP NOTICE: Updates might be a little slow for a while for a couple reasons: 1) I'm trying to convert all the codes to LiveWeave (new G.O.A.T.). 2) Really trying to spend less time on the internet. Updates will be sporadic for a bit of time.10/22/2021: Okay, here's a proper, typical "Resource.ju.mp" note. RISE AND SHINE! Except it's 10:25 PM here. Not sure what the future will bring for this rusty old resource Carrd... I'm seriously procrastinating moving all the code. And also I'm trying to spend less time using screens. My eyes are getting seriously messed up by this stuff... But woe is me. And I still want to remodel the site. Don't expect that any time soon, though.10/21/2021: I'm going out of town... AGAIN.10/20/2021: *Screams*10/18/2021: Sorry there haven't been so many updates the past few days, I've been sick, unfortunately... Hopefully some stuff today? Also inspo has been updated.10/13/2021: I manifested the new update... FINALLY! And... Help me keep brainstorming for where to move all the codes. Please. Or I might just web-archive em all... But anyways, GOOOD MORNING!10/12/2021: NEW UPDATES WILL COME TODAY. At least one (how to add images inline with text without positioning, without putting text in an embed. Also... FUCK! https://files.catbox.moe/pcnvzg.jpg. We're moving to Pastebin!10/11/2021: Okay nevermind, Sunday Funday was cancelled and there were no updates, my bad... Updates might be sporadic for a while because I'm going insane.10/10/21: Sunday Funday, guys! I'm gonna try to add a ton of stuff today if/when I get the chance. And happy birthday to Xyz.crd.co's Ref (only mentioning because I have a fat crush on her and I want her to think I'm a thoughtful guy who cares about her feelings) (I do).10/8/2021: Happy Friday, resourcejumpers! Am I tripping or did I update this site yesterday? I'll fix that.10/6/2021: Rise and shine! Font tutorials when?10/5/2021: Wakey wakey, everybody! Definitely font tutorials today, I'm hyping myself up. Throwback to the beginnings of Resource.Ju.Mp (Dinkle remembers) when I'd delete these messages every time I finished the update. Oh, how times have changed.10/4/2021: I might add some of the codes I've been working on here, but definitely expect a font tutorial soon, since I've been meaning to add it since the beginning of time.10/4/2021: Rise and SHINE everybody! Not sure what today will bring. My new favorite thing to work on is finding ways to use less code but make more effects. So.10/1/2021: I totally forgot what I wanted to add, haha. Well... IT'S ANOTHER AMAZING DAY!9/30/2021: GOOOOD MORNING! I actually have stuff I know I'm going to add today, nothing too special, but look out anyways!9/28/2021: RISE AND SHINE, EVERYBODY! Been a while since I wrote one of these morning messages. I am DETERMINED to start working on this more daily now, I'm on that crazy grind looking for codes to add... So. Stay posted!9/26/2021: Jeez! A week has passed since the last update! Sorry for the inactivity, everyone, I've gone kind of CUCKOO BANANAS lately BUT! I will start regularly updating this again soon. I promise.9/19/2021: BUENOS TARDES, PEOPLE!!! Updating as we squeak, includes the animations I talked about and God knows what else.9/18/2021: Good afternoon, everyone! I'm currently on vacation and updates will still be coming, just maybe at a slower pace. Coming soon: Basic intro animations, tutorial on positioning Nene's menus, and a piece on tethics.9/17/2021: Good morning, guys! Updates'll be a little sluggish until I either get to the resort I'm staying at, or get home. I might work a lot over holiday, who knows.9/15/2021: Good afternoon, everyone! Updates are going to go down in numbers soon because I'm working on commissions + I'm on holiday next week, but I'm still trying to squeeze out as much as I can :). I'll link some of the websites I've been looking at for inspo (thanks, Ref!) in here soon. Just took a Spanish quiz.9/14/2021: Buenos días, everybody! I'll work on some of my underground tutorial work today since it's been a couple of days. In the middle of the filter tutorials. Apart from this I might add some basic transitions just so people can have them while they wait.9/13/2021: GM! Some regular site updates, codes & stuff, but also... A redesign?9/12/2021: About to add a whole new section, but guys... We need to have a talk about the Cbox. I love you all but... This is insane. If you guys all want to talk to each other please exchange info or something, I need people to get the answers they're looking for.9/12/2021: Rise and grind, everybody! I have some stuff going on today but hopefully I can add some new codes & FINISH UP THE TUTORIALS because I forgot to work on them yesterday.9/11/2021: Gooood morning, everyone! I hope to add some links and add more stuff.9/10/2021: *Makes you breakfast* Gooood morning! I've been working on a lot of stuff for this site so get ready for that. A lot of tutorials.9/9/2021: I STARTED THE ANIMATIONS PAGE9/9/2021: Another day of saying I'm going to add animation tutorials.9/8/2021: GOOOOOOD MORNING EVERYONE! I'm adding some Carrd tips today/advice and some of my general design thoughts.9/7/2021: I'm striving to redo this Carrd. Updates out the wazoo IF and ONLY IF I get my shit together. So let's hope for that.9/4/2021: Rise and shine everybody! I'm starting to feel better and I have a long weekend so hopefully more updates coming soon. I REALLY WANT TO ADD AN ANIMATION TUTORIAL so you can expect that. Apart from that... We'll just have to see.8/30/2021: Sorry there haven't been so many updates, guys :( ! I've had school and I've been super sick the past few days so it's been kind of hard to work... I'll try to find some more codesGood night, Resource Ju Mp nation... Tomorrow may bring gifts...Goooood morning Resource Ju Mp nation! Will add Nene's fabulous codes today, will add more animation codes, maybe I'll finally come up with an original and non-bland menu...HAPPY BIRTHDAY NENE!!!!!!!!!!Help me. THE GOODMORNING MESSAGE DISSAPPEAREDD!!!Not sure what today will bring. Belated good morning to everyone. Also, a special thank you to Nene for all the code dumps! They all look great :)Wanted to wish everyone another good morning, thank you to everyone contributing in the Cbox, you're all amazing.Another glorious day on our earth! Don't know why I insist on putting off adding the paper mask. That's on my list every day. I'm working on adding all the codes here to my Pastebin in case W3 is down again, but I'm only allowed to add 20 per day because I have Pastebin Free or whatever. Not sure what I'm going to add today, but hopefully something is good! I think maybe a cool new border code?IMPORTANT SITE NOTE: I'll keep this up for a while, but if you guys haven't noticed, I go offline at 9pm EST on weekdays and 10pm EST on weekends because I have parental restrictions on my devices. Sorry if I only get to your questions in the morning, I try as much as I can to get everything in before I log off for the night.
8/20/2021: Rise and shine everybody! I'm going to create a "without W3" page today, look out for that, and maybe add some graphics, tips, and the paper mask.
Paper mask (which IS good with text boxes!)Written tutorials to accompany the videos/video tutorials to accompany the written onesEverything that's supposed to be a link but doesn't have a page yet (Graphics, Tips)
Text stroke with selection border
filter: drop-shadow(0px 1px black) drop-shadow(0 -1px black) drop-shadow(1px 0 black) drop-shadow(-1px 0 black);
Gradient Stroke
Image Mask
Img Stroke
Fading text. Fading text. Fading text. Fading text. Fading text. Fading text
background: linear-gradient(black, transparent);
-webkit-background-clip: text;
-webkit-text-fill-color: transparent;
<marquee behavior="alternate">Bouncing Marquee</marquee>
Or, like the other marquee, you can just put each tag in an embed before and after the text you want to be a marquee.
Bouncing Text CR @superjake45
<style>
@keyframes bounce {
0% {
transform: translate(0em,100%) skew(10deg);
}
50% {
transform: translate(0em,0%);
}
100% {
transform: translate(0em,100%) skew(10deg);
}
}
#text01 { animation: bounce .6s infinite; }
</style>
Gradient Mask
background: linear-gradient(lightgreen, blue);
-webkit-background-clip: text;
-webkit-text-fill-color: transparent;
<marquee>Insert your text here. To add an image, do this: <img src="imgurl">.</marquee> You can also put an embed that says "<marquee>" above text outside of an embed in the builder and then "</marquee>" in an embed below the text.
If you don't see the marquee playing above, reload the page.
Better marquee outside of embed HERE
Vertical Text
writing-mode: vertical-rl;
text-orientation: downwards;
Pulsing Text (Change colors to your liking)
<style>
#text01 {
animation: rainbow 1s infinite;
}
@keyframes rainbow {
0% {
color: #736CED;
}
25% {
color: #9F9FED;
}
50% {
color: #D4C1EC;
}
75% {
color: #F2DFD7;
}
100% {
color: #FEF9FF;
}
}
</style>
Text insert tuts: Pro Plus Pro Standard
These are all my W3school links, so they all have that special Jake touch.
Classic Windows bar. I used this in libertarian.crd.co. Code here, just put it in an embed above your container :) I can't show the preview on this Carrd because importing the stylesheet will effect the whole thing, but you can see it in my Carrd linked above and also in Moni's web.crd.co.
Border looks a lil funny on this Carrd
This text box is using the light cloud border!
You may want to adjust the outset values.
Change "draggable" to whatever the element ID for your draggable item is. Or, if you have pro plus, just give your elements the #draggable ID. (Code is glitching in this Carrd but I don't think a demo is necessary)

Color change on hover (hue rotation)
<style>
#hue {
transition: .7s ease;
}
#hue:hover {
filter: hue-rotate(100deg);
}
</style>
I'm crazy about drop shadow.

filter: drop-shadow( 0 1px black) drop-shadow( 1px 0 black) drop-shadow( 0 -1px black) drop-shadow( -1px 0 black) drop-shadow( 0 2px white) drop-shadow( 2px 0 white) drop-shadow( 0 -2px white) drop-shadow( -2px 0 white) drop-shadow( 0 3px black) drop-shadow( 3px 0 black) drop-shadow( 0 -3px black) drop-shadow(-3px 0 black) drop-shadow(1px 1px 0 red) drop-shadow(-1px 1px 0 red);
It's customizable and way better than that shitty SVG curved text. Generator here. Resize the box to fit your text with as little white space as possible when you're done to avoid gaps.
Codes I won't bother to fit on a page with the others:

Shaky hand filter. I really, really like this one. And it's not just for text. You can apply it to anything.
Here's a wavy filter for you. Works on text, images, containers, anything. Have a field day.

Code here. Paste into embed and give wavy stuff the "wavy" class, or change ".wavy" to "#container01", "#image01", "#text01", the usual.
Click each link for their codes. Link codes are the same for Pro Plus and Pro Standard. All you do is copy and paste everything in the W3Schools link into an embed. Voila.
Text-Shadow Link (Jake-approved)
Enlarge Link Ask Qs if any
Text-Stroke link (Used to be used in this Carrd)
Ticker Link, preview in W3schools
The Jake link (IDK what to call it)
Expand on hover (Basic, I know)
I've made some basic animations that you can use when loading elements. You can preview them all in w3, instructions included. If you have pro plus, you can also just copy and paste the @keyframes and put them in an embed and add the animation attribute into the element styles in the builder.
No-embed needed Carrd link stuff
Navigation
[Open in new tab](https://[email protected])
[Previous page](browser:back)
[Next section](section:next)
[Previous section](section:previous)
This is all using Carrd's Markdown formatting! If you need more click "any valid URL" when you see it in the builder (seen below) ↓
-

Click to enlarge

Customizing Link Styles (Pro Plus only)
1: Select your text
2: Click the gear option, navigate to styles
3: You typically add text styles in the "Text" section. Look below it. Edit the link styles only in the section called "link". See below ↓
-

Click to enlarge

-

Insert text in the "caption" section, line breaks aren't supported. Make sure to check the "span multiple lines" box.

-
Pretty neat.


Hover over each version of the image for a different effect, all of which were made with absolutely no embed or CSS. You can even make these animations with a free plan.
STEP ONE: Create a gallery. Add your image (you can do this on a regular image too, but only a gallery image can have the text over it).
STEP TWO: Click the icon between the gear and paintbrush.
-

Click to enlarge

STEPS 3 AND OPTIONALLY 4:
Use the drop downs and sliders to customize your animations. If you add a caption, the "Captions: On Hover" section will show up and you can use that.
-

Click to enlarge
-

Click to enlarge


OPTIONAL 5:
For text on hover, add your text in the "Caption" section when you add your image. Make sure to select "Span Multiple Lines" in the design/"paintbrush" section under the "Captions" tab.
Adding Inline Images Outside of an Embed
LEAVE EMBEDDED TEXT IN 2021.
Here's how to add images inline with text like img so without having your text in an embed OR using positioning. Because positioning is the WORST.
Step One: Type your text out. Wherever you want to add an image, add some placeholder text, it can be anything, and highlight it. Like ==this==. Give your text the "highlight" class. If you have pro standard, don't worry about it.
Step Two: Create an embed that looks like this (change ".highlight" to your text ID if you have pro plus, something like "#text01"):
<style>
.images mark:nth-child(1) {
content: url("https://files.catbox.moe/4yaz8z.gif");
background: none;
}
</style>
(Let's break this down. nth-child(n) is a selector element in CSS that allows us to divide one element into individual elements without having to create more, if that makes sense. The reason we're using it here is so when you add different images using the same element it'll show up as different images without us having to use a ton of CSS... because we can't, since it's Carrd, and Carrd's markdown doesn't support HTML. mark is the CSS highlighting element.)
Step Three: Edit the link between the quotes so that it's your image URL. Adjust the width and height of the image by adding "width: value;" and "height: value;". See what it looks like automatically before adding styles, though. Might be just right by chance.
Step Four (optional): Adding multiple, different images in the same text element. No sweat. Just copy and paste all the styles you have so far and change ":nth-child(1)" to ":nth-child(2)" and so forth, changing the number to the next consecutive one for each highlight changed into an image.
Ask me any additional questions you might have img!
SCROLL ON SOME.
Adding more as often as possible.
HOVER CODES
Element appear on hover, marquee pause on hover,slide on hover, special tooltip text that follows cursor, Pop container, Breeze letters, Hover/rotate/expand, color change on hover
MENU CODES
Drop down menu, Tabs (Preview not available on this Carrd), Blur Menus, Drop down 2, works on mobile, Gina.crd.co, cred 805online, Simple slide up, Heart menu, Sectioned hover, Horizontal scroll,
BORDER CODES
Squiggly border, Animated cloud borders, Rainbow border, Fog border, Gradient border, Pulsing border, Black frame code, Gold frame code, credit Nbsaki on Instagram, Nene's lace borders, Fog border on transparent/image background AKA box shadow, Double border with different colors, Naked Frame cr @superjake45,
MISC CODES
98.css, Windows titlebar, Draggable elements, Flip/change image, also sort of an animation code (credit me), TV set filter (flash warning, looks weird on this Carrd), Fog masks, Custom selection, Cursor Image Trail, Image Clicksplosion, Nene's masks Batch 1 (VERY CUTE, RECCOMEND), Invisible scrollbar, Nene's masks: second edition, Paper mask, Custom Highlight, Disable left click + alert, Different background on section without using a container, Image drop shadow/glow, multiple outlines/borders/text stroke
ANIMATION AND FILTERS
Rubber Band, Jerky Tilt, Spin, Elastic hover, Bouncy code, credit @superjake45 if you so wish, Animations on load (slide in, rotate in, blur in, ETC), Wavy filter, Shaky hand filter
Italicized: Super fav
Asterisk: Fav
Image Sharing: Imgur, Catbox (You can share more than images!), Imgbb, Pasteboard,
Etc: Beautifier (Organize inspected Carrd code), Html Cheatsheet,
Colors: Name That Color, Name That Color (improved), Color Chart, Coolors (Generate color palettes)
Generators: W3Generator, Fancy border generator
I don't even use most of these, some haven't been updated since April/May of 2021, some are totally defunct, but I added them nonetheless. These are mostly sorted chronologically by when I saved them, with my favorite Carrd from each category being first. If you want me to add or remove your Carrd, let me know :). Italicized = Fav.
Just Codes, Links, Tips, Etc:
Archivos (Previously Limonysal), Neogeo, Pochi, Funhouse, Gifs crd (Literally like one of the first 5 resource Carrds ever), Arcjec, Pep, Callie, Galaxy, Codes Ju Mp (WIP), Himiko, Swaggy, Cakepop, Holy, Lesbiana, Kinnie, Gloss, Cartitas, Bubblegum, Fitz, Qri, Jellymask*, Ishimori, Graphics
Just Graphics (and links, tips, sometimes): Xyz, Yokai, Darkpixel*, Gifs carrd, Gifs4Crds, Pixel, Eridan, Literature, Medicine, Agent, Barbara, Owe, Supplies, Gallery, Twst, Pix, Pixels, Transparent, Tomomi, Pale, Innocence, Kedamono, Cereza
Graphics and Code & Other: Teaclub, Watermelon, Peko, Gnome, Wonderhoi, Latte, Lolcow, Sweetie, Madness, Lethargic, Kanaya, Midnight, Lili, Signal, Vnc, Mori, Wilardo, Frogpop, Gag, Autism, Meow, Tools, Gardenia, Epic, Lifted, Sweetarts
Carrd resources made by literal grown men: Starrt, Cheatsheet
View the Github page here
Just paste <link rel="stylesheet" href="https://unpkg.com/98.css" > into an embed somewhere and you can create effects like in libertarian.crd.co, the buttons, the windows, and such. Worry not -- everything doesn't have to be in an embed. You can always take advantage of Carrd's inline code, pro standard or plus. To elaborate what I mean, look at what you do in this tutorial. What I'm getting at is instead of putting <button>Click me</button> into an embed to get the Windows 98 button effect (curse you AJ for creating non-traditional buttons in Carrd!), you can create an embed that says <button> and put it before your button text, then follow it up with an embed that says </button>. But that is kind of a hassle so for the buttons specifically, bad example, sorry. Am I explaining this well? JUST LOOK AT THE GITHUB PAGE, GODDAMNIT!
Oh, and if you're looking for something more modern, check out XP.css. Sleek as FUCK.#
I accidentally put this code in the text section

On a container

You can create an image as a placeholder and give it the element ID "thething". Or, if you have pro standard, you change "#thething" to "#image01" or whatever the ID of the placeholder image is. Remove the "width" attribute, I only put it there for display. And remove the stuff after the style tags. I only have all that so if you decided to plug it into W3 you can see what it looks like.
Credit @superjake45 on the Gram for this, the frame is from the Talking Heads album Naked. See it here. You can adjust the width of the border image however you like.
Seeing that animations are all the rage right now, let's dig in, shall we?
Step One: Making the animation
Step Two: Adding the animation
Step Three: Infinite or Nah
Video Tutorials TBA
Example on primate.neocities.org and on taxidriver.crd.co. Credit me (@superjake45) if used. Thanks. Code here.
The first thing you should know when making CSS animations for Carrd are the different transform functions. The values you'll probably use most are the following:
1. rotate
2. scale, scaleX, scaleY
3. translate, translateX, translateY
4. skew, skewX, skewY
Click on each function value to read on how to work them.
Before introducing each value in code, add "transform:". EX: "transform: skewY(20deg);".
Don't worry about any of the "3d" versions of these values (ex: rotate3d, translate3d). If you want a more in depth look at the transform property read this or this. I'm just stating the basics. PS: Don't worry about "rotate"'s "x" and "y".
X and Y axes (Also the "translate" section)
Adding two different transform values at once
Not specifing X or Y
You could just as easily say "transform: translate(-3em);" as saying "transform: translateX(-3em);". This is because CSS prioritizes the "X" axis. Instead of saying "transform: translateX(-3em) translateY(10em);", you could say "transform: translate(-3em, 10em);".
Specifying X and Y
X is referring to the horizontal axis of an element. Look at this example (click to enlarge):


No translate code has been added. The element we are about to edit, the little emoji man, is in it's original position within the box.


Now I've added "translateX(10em);" as a value. As you can see, the image has moved 10 "ems" horizontally. By default, it pushes the element from the left. To push from the right, you would change "10em" to "-10em". If this reminds you of something, you're probably thinking of typical CSS positioning.


I changed "translateX(10em);" to "translateY(10em);". This means that the element is now being positioned vertically. By default, it will be pushed from the top. To push from the bottom, you would change "10em" to "-10em".
Say "transform:" like usual, then just add your values with no commas in between
EX:
transform: rotate(20deg) scale(.5);
This is probably the easiest function to explain.

This image by default has a property of "rotate(0deg);".

I have added "transform: rotate(20deg);" to this version of the image. You'll see that it's "pushed" from the left side.

The rotate value of this version of the image is "rotate(-20deg);". Setting the value to a negative number "pushes" this image from the right side instead of the left.
This function is pretty easy to understand. "Scale" is exactly what it says in the name-- it defines the "scale" of an element. By default, an element will have the unwritten code of "transform: scale(1);". Changing the number from "1" to "2" will double the image in size. Inversely, changing the number from "1" to ".5" will slice the image size in half. Let's say you wanted to size only an image's width, or stretch it.

transform: scaleX(2);
I have doubled this image's width, and therefore, stretched it like slime, horizontally.

transform: scaleY(2);
I have doubled this image's height, and therefore, stretched it like a rubber band, vertically.
I find this value to be the hardest to explain, but one of the most fun to use. According to developer.mozilla.org, "The skew() CSS function defines a transformation that skews an element on the 2D plane." That's probably the best way to put it.

transform: skewX(20deg);
This element has been almost stretched vertically and diagonally, leaning to the left.

transform: skewX(-20deg);
This element has been almost stretched vertically and diagonally, leaning to the right.

transform: skewY(20deg);
Stretched horizontally and diagonally, leaning to the right.

transform: skewY(-20deg);
Stretched horizontally and diagonally, leaning to the left.
What We Already Know
When learning CSS, you'll find that a lot of things overlap. The same rules that you apply to the "transform" property often apply to the filter property, too. The most important thing is that before adding a CSS filter, you will ALWAYS start out with "filter:" and then you insert your value. The syntax is as follows:
filter: none | blur() | brightness() | contrast() | drop-shadow() | grayscale() | hue-rotate() | invert() | opacity() | saturate() | sepia() | url();
If you're using multiple filters, separate them with a space (as you would with different transform functions). Click each value to go to its page.
filter: none;
This is the default value given to an element. It's what you expect-- no specific filter is applied. This can not be used in function with other filters. You would mostly use this to revert an element back to normal after having a fiter. Examples:

I didn't specify the filter for this image. Therefore, its unwritten code is "filter: none;".

<style>
.tut img {
filter: blur(5px);
transition: .5s ease;
}
.tut img:hover {
filter: none;
}
</style>
(For context: The image posesses the "tut" class). Observe how when you hover over the second image, it loses its filter. Of course, if you were to have multiple filters over this element and only wanted to remove the blur function, you could instead just set the hovered blur value to (0px). But that's a different story.
filter: blur(px);
This filter is incredibly simple. It applies a blur to your element. A higher number before "px" (pixels) creates a larger blur. Examples:

filter: blur(0px);
This is also the default blur value.

filter: blur(10px);
Too much blur.
brightness(%);
This, along with the blur filter, is quite easy to understand just by the name. A common household and academic word, the "brightness" function is exactly what it states: It adjusts the brightness of an element.
0%: This sets the element to ultimate darkness.
100%: This is the image at its most REGULAR. This is the default setting.
Any values above100% will brighten the image.
EXAMPLES:

filter: brightness(20%);
A little dim.

filter: brightness(300%);
AAAAH I'M BEING FLAYED ALIVE HELPP MEEE PLSS!
My Carrd tips & preferences :)
Stop making them
Double Border with Two Different Colors
This doesn't work on images :(
We all know how to add a different background on a section using containers, but then you can't add any additional containers inside the page. Here's what you do:
1: Create an embed, copy and paste this code into it (place it into the section you want to have a different background).
2: Add your image url between the quotes in the background part. If you want a color instead, just add the HEX code or color name. Voila!
Ask me any questions about background positioning or read this for a more detailed look into the background attribute.
I'm sure you've seen this code before, refer to any of those Carrds with the two slide out lace scrollboxes, YKWIM. I use it here for my labels. And for example. Pro plus users can also just paste the stylings for highlighted text in the "Highlight" styles of their text element.
To round the borders: "border-radius: 10px;" and adjust "10" however you need.
If you need to add more letters, LMK!
Credit @Cyberpinked (Twitter) and @Adhgkakgmskdj._ (Instagram) for this code! And credit @superjake45 (Instagram) if you repost to your resource Carrd because I optimized it for Carrd.
RESOURCES

Another amazing menu by Sol, Nene is seriously always on that grind and I appreciate it more than can be put into words...

Hover over the image or this text!
For everyone: delete the stuff about "body", that doesn't matter, I just added that so you could view the code better.
For anyone using element IDs: Delete everything after the </style>, you know the deal. Pro Plus: Give your element the "sling" class. Pro Standard: change ".sling" to "#text01", "#image01", "#container01", etc.
Hover over this container!


How I created shore.crd.co (a mix of Carrd's button events and column styling):
-

This is what the Carrd looks like in the builder. As you can see, it's a container with three columns.

In the builder, I set the width of the container to 35em, simply so I could see all the columns in the width that they'd approxiamately be in the final product. In an embed, however, I set the container width to 26em (#container01 { width: 26em; }).
-

These are my styles for the third column. There are three important parts I'll talk about below.

1. display: none; This is pretty straightforward; the third column won't be displayed on the site until prompted, which we'll do by using Javascript events with Carrd's buttons later on.
2. animation: iloaded 1s forwards; This makes it so whenever this column's display changes to block or inline-block it'll play an animation on load.
3. width: 50%; This is the same width I give to the 2nd column in its styles, so that when they exchange places the proportions of the container are the same.
-

Script for the first button
-

Script for the second


You get to the button onClick page by clicking on your button, clicking the name, and scrolling down through the individual styles until you see this screen. You have to use the document.querySelector() selector for this change because to change the column styles you have to call to a name that's neither a class or an ID. Essentially, if you click the arrow pointing backwards the second column's code is like this: display: inline-block; (it's visible) and the third column's code is like this: display: none; (it's not visible and basically doesn't exist). And vice-versa for the second button.
Hope this helps!
SCROLL ME! Lorem ipsum dolor sit amet, consectetur adipiscing elit, sed do eiusmod tempor incididunt ut labore et dolore magna aliqua. Ut enim ad minim veniam, quis nostrud exercitation ullamco laboris nisi ut aliquip ex ea commodo consequat. Duis aute irure dolor in reprehenderit in voluptate velit esse cillum dolore eu fugiat nulla pariatur. Excepteur sint occaecat cupidatat non proident, sunt in culpa qui officia deserunt mollit anim id est laborum.
When adding a box shadow to a container, you don't even need code. You can do this in the Carrd builder by scrolling through your container settings and editing the box-shadow.
This is just pasted into my text styles.


The cropping if off on this site, it's because of the columns. Just look at the W3schools code.


This cursor is great for faking like you have a custom cursor on mobile.
Blur Default
Slide Up
Blur Rotate
Expand Y
Hover over all the images to see the effect in action. These are all Pastebin links and only work as embeds. RIP W3Schools.

This code won't show up in this Carrd because it already has other sections, but you can see the code in the W3Schools link. As proven on this Carrd, it will only work on a Carrd with one section, because the code itself creates new sections.
To see this code in action, see Nene's monoe.crd.co. Everyone say we love you, Nene!

ID CODE: Paste into embed, set ID of your element as "gradientb". EMBED CODE: Everything is in an embed. STYLE CODE: Copy and paste into element "styles" tab.
PS: I couldn't get W3Schools to work, so these are Pastebin links.

ID CODE: Paste into embed, set ID of your element as "border". EMBED CODE: Everything is in an embed. You can't just paste this code into your element styles, sorry.
This effect also works on text boxes, but for some reason it was glitching on this carrd.

ID CODE: Paste into embed, set ID of your element as "popcont". EMBED CODE: Everything into an embed. Again, can't paste into element styles.
Select this
Code is the same for plus and standard, just copy and paste into an embed. "color:" specifies the color of the text when you highlight it, "background:" specifies what replaces the typical blue. This code is not supported in Safari.

For on hover-- #elementid:hover { animation: spin 2s linear infinite; }
You can just add "animation: spin 2s linear infinite;" in the element styles without adding the keyframes because Carrd already supports that animation. Try not to add spinning text.
Hover for what a spinning container looks like
I won't preview this code on this Carrd, I'm sure you've seen it before, though.
Embed to apply code to entire Carrd
For a better example of this code in action, see eye.crd.co.
Applying the TV tutorial on Pro Standard:
IF YOU WANT TO APPLY THE CODE TO THE ENTIRE SITE JUST USE THIS CODE AND PUT IT IN AN EMBED
1. Copy and paste this code into an embed.
Here you have two-ish options:
2a. Option 1: Code all the content of your Carrd into one embed, starting with the "<div id="crt">" tag and adding a final "</div>" at the very end of the code (putting everthing into the "crt" ID (has to be ID, not class, as seen in the code linked above. This requires some coding knowledge or at least a lot of Googling and Stack Overflow. It also makes it harder to optimize your Carrd for both mobile and desktop, if that's important to you.
2b. Option 2: Create a header. At the very top of everything in your header, if there is anything at all, create an embed that says "<div id="crt"></div>". Make sure the embed is in a container with "Full Screen" width, no vertical or horizontal padding, 0 margins, and scroll down in the container settings where it says "Contents" and set the width there to 100. This applies the "crt" ID to the Carrd. The blue and red effect may not show up on everything, though, but that shouldn't really matter.
2c. Very Optional Secret Option 3: Change everything in the code that says "crt" to "image01", "text01", "image02", "text02", "container02", so forth and create a new duplicate embed with each different ID name in it. This applies the code to literally every element that you create in your Carrd, so long as each have an embed with their unique ID in it connected to the CRT styling. You can combine this option with option two to have the maximum effect.
Ask any further questions in the Cbox.
(DOES NOT WORK ON MOBILE) This code may be trickier than some others, so I'll make a lengthier tutorial for it soon. As always, instructions are in the code and any additional questions can be asked at any time!
The code is the same for plus and standard, copy and paste it into an embed where you wish. Edit the appearance of the dropdown between "style='" and "'". Any questions? The Cbox is open.

Adjust how fast it slides out by editing ".2s". The "s" is for seconds. Adjust how far back it starts by editing "-3em".

This is an image with a rainbow border in a container with the same rainbow border.
Standard Code Here (container)
The plus code goes into the element "styles" section. No need for ID/Class names or anything.
W3Schools was glitching. Copy and paste the following into your Carrd:
border: 3px solid;
border-image-slice: 1;
border-image-source: linear-gradient(to bottom right, #b827fc 0%, #2c90fc 25%, #b8fd33 50%, #fec837 75%, #fd1892 100%);
PS: This fog mask is my code, if you want to use the other one instead, here it is! Code here. Both are kind of wonky and need to be played with to get them just right for your purposes. The only difference is mine is more of an oval, the other one is

I do not reccomend using the fog mask for a text box.
Code includes instructions and tips. Delete everything that isn't code. If you have any questions, LMK!
This is a container using the fog mask code.

Text Vers.
These codes work for text, images, containers, and more.
This container is using the fog border code.
Just paste the plus code into an element's "Styles" tab. No ID/Class needed.
How to use for: Pro Plus and Pro Standard. Not all codes use @font-face.
Fonts recommended for Carrd
Fonts recommended for a real web project
Open Source Type (Scroll)
Last updated 10/24
Open FoundryVelvetyne (beware: some of these are very hard to read)CollletttivoSuvata
Regular ass type foundries I like
Brownfox. A lot of European fonts, very clean. Full families typically come out to $140.75 dollars. My favorites are Coil and Wermut.Grilli Type. Fuck, every time I go through one of the font preview sites I get cum all over myself. Sorry. But anyways, GT's fonts are AMAZING, kind of pricey, though.Extraset. Good God. Just look for yourself. Holy fucking balls.
Hover over this container
If you have pro standard, change ".item" to "#container01" or whatever your container ID is, and change ".appear" to "#text01", "#image01", etc. If there are multiple elements inside a container you want to appear on hover, copy and paste .appear { opacity: 0; position: relative; transition: all 0.3s ease; } as many times asa needed and change ".appear" to each ID.
Pro Plus
This code is universal. It works with text, images, containers, and anything else.
Pro Standard
Could also work with a container, but all contents have to be in your code.
Text with the rubber band code here

Container with the rubber band code here
Code CR to Allison of xyz.crd.co
Pro Plus
Universal code.
Pro Standard
Avoid putting a lot of information in this code because, like with the rubber band code, it may not be the easiest to read and could come off poorly.
Text with the jerky rotate code here

Container with the jerky rotate code here
Video Tutorial
I'll add a written tutorial later. Let me know if you like these video tutorials or the written ones better, I'll probably make both for each tutorial anyways, but I'd still like to get feedback.
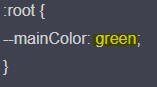
:root --mainColor: Specifies the underline color. In this case, the underline is green.

The "stroke" specification is found in a:hover. After it is stroke-width. This is where you edit the color of the squiggle. DO NOT DELETE "%23". Replace everything after "%23" with your color's HEX code. DO NOT ADD A "#" sign. Only the numbers and letters. The reason you can't get rid of "23" is because it specifies the color's opacity.
Disclaimer: Some codes, like the image mask, won't work like this. Click here for a tutorial on those. Click here for how to add marquee text. Also, this tutorial is pretty long.
1. Open the code for the text. An example is the code for the text-stroke with selection border: here.
2. You can copy everything within the style tags, don't copy the actual div label (ex: "#text", ".text").

For this, you'd only copy what's highlighted in the image, which you can click to enlarage. You could copy the color and font-size labels, but you can also just edit those in the Carrd builder, so there's no point in doing that.
3. Open the Carrd builder. Click on the element you want to add the code to and click the "gear" symbol next to the paintbrush.
4. Click "styles" and paste your code into into the "Default" tab. If you want it to be different on mobile, click the "Mobile" tab and edit it there.

Click to enlarge.
1. A: Find the code you want to add. B: Create an embed where you want the text to be. For this tutorial I'll be using the gradient mask code, which is here.
2. Make sure the embed type is set as "code" and the embed style is set as "inline".

Click to enlarge
3. Paste your code into the embed below where it says "code".

Click to enlarge
4. Edit anything to suit your preferences. Most commonly you'll be editing things like color, font-weight, font-size, gradient or text stroke colors, etc. I edited the font size, the colors, the font weight, and the font family.
5. Edit whatever text is between the div class/div id/span class/span id/marquee tags. If the tags are none of the above, just look at what text is being produced, then locate that text in the code and edit that.
Extra notes: If you use the same code twice, but tweak certain details, like how I just used the gradient text code in an embed twice, and had different font sizes each time, you'll need to edit the ID or class name to something else, or else they'll both inherit the same style. If you are using the same code twice in different embeds and want them to look the exact same, you don't need to copy what's between the <style> </style> tags for the second embed. It will inherit the style of the first one because they are using the same ID/class name.
HOW TO STYLE COLUMNS IN A CONTAINER IN CARRD
It can be a little frustrating, but stick with me.
Below, you'll find a basic stylable code. Change "#container01" to the ID of whatever your container's ID is. The number in parantheses in "nth-child(#)" is the number of your column. For example, styles for the first column would go in the styles for "#container01 > .wrapper > .inner > :nth-child(1)". The "width" of both of the columns combined MUST EQUAL LESS THAN 100% if you want to have space between the columns. Here, the second column would take up half of the container, and the first column would take up 45% of the container, leaving a 5% margin between the two.
Some common things you might want to add in the styles for your containers are border codes (ex: border: 1px solid black; , border: 5px double red;), background codes (background: color; or background: url(imageurl.filetype);), or a padding value (padding: .5em;). LMK if you need help with anything!
<style>
#container01 > .wrapper > .inner > :nth-child(1) {
margin-left: auto;
margin-right: auto;
width: 45%;
}
#container01 > .wrapper > .inner > :nth-child(2) {
width: 50%;
margin-left: auto;
margin-right: auto;
}
#container01 {
justify-content: space-between !important;
margin: auto;
}
</style>
Step one-- create an embed. Paste this into the embed:
<link rel="stylesheet" href="https://unpkg.com/98.css">
<div class="window" id="draggable">
<div class="title-bar">
<div class="title-bar-text">A Window With Stuff In It</div>
<div class="title-bar-controls">
<button aria-label="Minimize"></button>
<button aria-label="Maximize"></button>
<button aria-label="Close"></button>
</div>
</div>
<div class="window-body">
Step two -- put everything you want to be inside the window between "<div class="window-body">" and another embed below all your content that says " </div> </div>". Voila! Additionally, if you want it to be draggable, also paste:
<link rel="stylesheet" href="//code.jquery.com/ui/1.13.0/themes/base/jquery-ui.css">
<script src="https://code.jquery.com/jquery-3.6.0.js"></script>
<script src="https://code.jquery.com/ui/1.13.0/jquery-ui.js"></script>
<script>
$( function() {
$( "#draggable" ).draggable();
} );
</script>
into an embed. Hope that helps :)
ONE/TWO TUTORIALS
1. Squiggly Link tutorial
2. Element ID/Class Video tutorial
3. Embed scrollbox with with images in it
4. TV Set tutorial for Pro Plus (Outdated-ish)
5. Change marquee speed
6. How to use the shaky hand/turbulence filter
7. How to add sound effects to every element outside of an embed/for pro STANDARD as well as plus
8. How to style each column in a Carrd container
9. Shore.crd.co tutorial
10. Adding the windows Window in Carrd (bonus: how to make it draggable)
11. How to stop the font size from getting fucked up when you use 98.css and XP.css
3+ TUTORIAL SETS
1. Adding text codes
2. Transform tutorials and introductions
3. Marquee that you can see in the builder
4. Customize links outside of an embed, navigation stuff with no embed (like previous page links, etc)
5. No embed image animations/blur menu thing
6. Adding inline images outside of an embed
7. Animations on load without an embed.
8. Filter tutorials and introductions (unfinished)
body { font-size: 1.4em !important; }
Easy as pie
1. Marquee that you can see in the builder
2. Customize links outside of an embed, navigation stuff with no embed (like previous page links, etc)
3. No embed image animations/blur menu thing
4. Adding inline images outside of an embed
5. Animations on load without an embed. NEW 10/21
Loading Animations Without an Embed
Click on your element. Select the "play" button. Select from the drop down under the "On Visible" section.
-

Click To Enlarge

I am able to view this marquee in the builder
Credit me if you add this in your resource Carrd!
WHY IS THIS BETTER THAN OTHER MARQUEES? 1: You can preview it. 2: Won't freeze up like marquees do. 3: Easier to be customized.
If you want it to scroll vertically instead of horizontally, use this code.
1. Create the element you want to be a marquee. Paste this in the element styles:
display:inline-block;
white-space: nowrap;
animation: marquee 20s linear infinite;
2. Add "overflow-x: hidden;" into the parent element's styles (unless you want it going across the whole page).
3. Create an embed with this in it:
<style>
@keyframes marquee {
0% {
-webkit-transform: translate(50%, 0);
transform: translate(50%, 0);
}
100% {
-webkit-transform: translate(-100%, 0);
transform: translate(-100%, 0);}
}
</style>
EXTRA:
Pause on hover:
<style>
#marquee:hover {
animation-play-state: paused;
}
</style>
Add the above code into an embed and then give your marquee element the "marquee" ID.
Adjust speed: Change the "20s" in "animation: marquee 20s linear infinite;" to a higher number (slower marquee) or a lower number (faster marquee).
1: Create the element you want to be a marquee.
2: Create an embed with this code in it:
<style>
#container01 {
overflow-x: hidden;
}
#text01 {
display:inline-block;
white-space: nowrap;
animation: marquee 20s linear infinite;
}
@keyframes marquee {
0% {
-webkit-transform: translate(50%, 0);
transform: translate(50%, 0);
}
100% {
-webkit-transform: translate(-100%, 0);
transform: translate(-100%, 0);}
}
</style>
Change "text01" to the element ID of what the marquee element is. Change "container01" to the container ID that the element is in.
EXTRA:
Pause on hover:
<style>
#text01:hover {
animation-play-state: paused;
}
</style>
Adjust speed: Change the "20s" in "animation: marquee 20s linear infinite;" to a higher number (slower marquee) or a lower number (faster marquee).
If you have pro plus: Copy and paste everything into an embed. Paste "animation: squiggly-anim .5s linear infinite;" into your element styles. OR: You can give your elements the "scratch" ID. But that means if you apply drop shadow or a border or something like that to even just one element with the filter, it will apply to everything else with the filter, and you'll have to keep creating duplicate IDs. So just paste "animation: squiggly-anim .5s linear infinite;" into your element styles.
IF YOU HAVE PRO STANDARD:
Paste everything into an embed. Change "#scratch" to "#image01" or "#text03" or "container02" or "#gallery01". You get the point. If you want to apply it to multiple elements, you can add a comma after the first ID and add the second after that (ex: #image01, #container01, #gallery04 { animation: squiggly-anim .5s linear infinite;, or just keep copying and pasting the styles and changing the ID.
Element Styles Embedded Text
Element ID
Using the element ID for pro standard: replace whatever the ID is (ex: #wobble) to the ID of your element (ex: #wobble becomes #text01 or #image02)
Code here, to change the speed edit where it says "25" in the scroll-amount attribute, a higher number makes the marquee faster, a lower number makes it slower.
Adding sound effects...
For pro standard, or if you're trying to add sound effects to text, a container, or anything that isn't an image or button:
<script>
document.getElementById('text01').onclick = function() {
document.getElementById('sound').play();
}
</script>
<audio id="sound" src="catbox or dropbox url here" preload="auto"></audio>
If you have pro plus and are trying to apply the sound effect to an image or a button, you could use the method above, or you could just put this in an embed:
<audio id="sound" src="audio url here" preload="auto"></audio>
And paste this into the styles of the element that says "Events":
document.getElementById('sound').play();
1. To make a scrollbox:
a) Vertical scroll
overflow-y: scroll;
b) Horizontal scroll:
overflow-x: scroll;
Welcome to Dinkle's Den!
Hello resourcejump fans it is your beloved dinksy HERE and I now have a section on this site!!! This section is just about my personal favorite sites, random shit I like, and fun stuff:) Don't take it too seriously! If there's any site recommendations, let me KNOW!!!
Hi I am Dinkle or Dinksy as you probably know! But you might not actually know too much about ME!! So, I'm 13, White+Japanese, and my pronouns are he/she! Some extra info is that I'm neurodivergent and I'd appreciate if you were patient with me. I'm interested in Hololive, (NePoRaBo, and GAMERS specifically) Yume Nikki & Yume 2kki, and YOUR MOM! Hope we can get along well ("・w・)_
Not fully updated, for the full list visit here.
Stuff! (Scroll)
Windows93 is a website styled to look like early 2000's internet and has a lot of fun applications such as emulators, art programs, and more! Usually not blocked on school devices.
The 88x31 GIF Collection: Exactly what it sounds like, a ton of old buttons from the 1990s to early 2000s.
Your World of Text is an infinite site where any person who visits it can edit text on any part of the grid.
r/Place atlas basically just an archive of r/Place with a description for every single piece of art and history on r/Place!
ASCII art creator The name is self explanatory! Make your own ASCII art!
Waifu2x a site for resizing images & making them more high quality - specifically designed for manga/anime styles.
Superbad I don't know what to say for this one. Have fun exploring!
Neocities! (Scroll)
Burypink website created by a touhou, vocaloid, and anime enthusiast! I like to explore this site and read about their interests.
Cadnomori someone's personal neocities site. Shrines, about, and other pages. Cute layout and graphics~ good for inspiration!
Dokodemo Sunny's personal site! Based off the old web and is made to entertain others and represent the owner's love for the internets!
Sninkygle Odd website, similar to yyyyyy.info, with text wrapping around the page and other places to go when you click on specific elements
Bill's World BROWSE THE WEB LIKE IT'S 1999! Fantastic personal site belonging to bill which is sorta like a time capsule for viewers in the future !!! Super cool!!!!
Housefly You'll catch death out there, hurry in.
Komaeda To be honest, I don't even know how to describe this one. Just have fun with it, I guess!
Max2019 Leftovers from a 2018 tumblr ARG. Fun to explore. If you're interested on learing more about the ARG, I recommend Izzzyzzz' video here.
Zanarkand! Animecore fever dream! Cute layout + aesthetics + graphics! Nowhere near complete, but fun to explore nonetheless!
EYESTRAIN WARNING: Y2k A website made to improve the owner's coding skills. Features their personal bookmarks, graphic, arts, shrines, etc.
EYESTRAIN WARNING: vomitboyz Gabriel's homepage. Another animecore themed site. Includes: shrines, graphic collection, fun stuff!
Mainly fandom stuff (Scroll)
https://yumenikki.fandom.com/wiki/YumeNikki
https://yume2kki.fandom.com/wiki/Yume2kkiWiki
https://uboachan.net/
https://www.mediafire.com/folder/ksa2gat87l9i0/YumeNikkiMercariResults
https://www.mediafire.com/file/yrl4ngn6sqq4iqf/Yume+Nikki+Translated+Files.zip/file
https://hrazak.github.io/hololivePixel/
https://hololive.hololivepro.com/en
All of my non-deleted Carrds are linked here!
Some other places I look for inspo:
Here (brutalist websites), here (basically Carrd for adults), and here (a ton of super cool websites).
These aren't my best Carrds, in fact, they're pretty old and ugly and some of them are even deleted. For my more recent Carrds, click the link above. My portfolio was last updated on 12/6/2021.
